OAuth 2.0 authorization for e-mails and Smart Connectors
This is an old version of the article. Please check the actual version in our new Knowledge Base.
OAuth 2.0 authorization for e-mails and Smart Connector
- Overview
- How to get access to the OAuth 2.0
- Configure e-mail services
- Configure Google Cloud account
- Configure Microsoft Azure account
- Configure XTRF
- Configure SMTP settings
- Configure Smart Connectors
Overview
The OAuth 2.0 is a new authorization protocol that offers a secure way to share resources between two different sites using only the username and password tokens (no credentials are exposed). Several services have already switched from basic authorization to OAuth 2.0, and XTRF is keeping pace with those changes.
How to get access to the OAuth 2.0
As for now, OAuth 2.0 is only available for Google Cloud Platform (Gmail) and Microsoft Azure (Outlook/Office 365) accounts.
To start using the OAuth 2.0 authorization protocol, please contact our Help Desk. After you get a confirmation from our team that the service is enabled, you’ll need to make some configurations both in your e-mail service settings and the XTRF Configuration menu.
Configure e-mail services
Configure Google Cloud account
- Login to your Google Cloud Platform account.
- Create a new project or open an existing one.
- Go to APIs & Services in the Navigation menu or Quick Access menu.
- Click the +Enable API and Services button at the top of the page. You will be directed to the API Library.
- In the Google Workspace section, click the Gmail API card.
- Go to the Credentials tab, click the +Create Credentials button, and select the OAuth client ID option.
- From the Application type drop-down list, select Web application.
- In the Name field, provide a name for the new OAuth client.
- In the Authorized redirect URIs section, add a new URI like: {your-host}/home-api/authentication/mail/oauth2/code, where {your-host} is your DNS, e.g., https://xtrf-app/home-api/authentication/mail/oauth2/code
- Click the Create button.
- Copy the ClientID and the ClientSecret that will appear in the OAuth client created pop-up. You can also find them later in the newly created OAuth client profile.
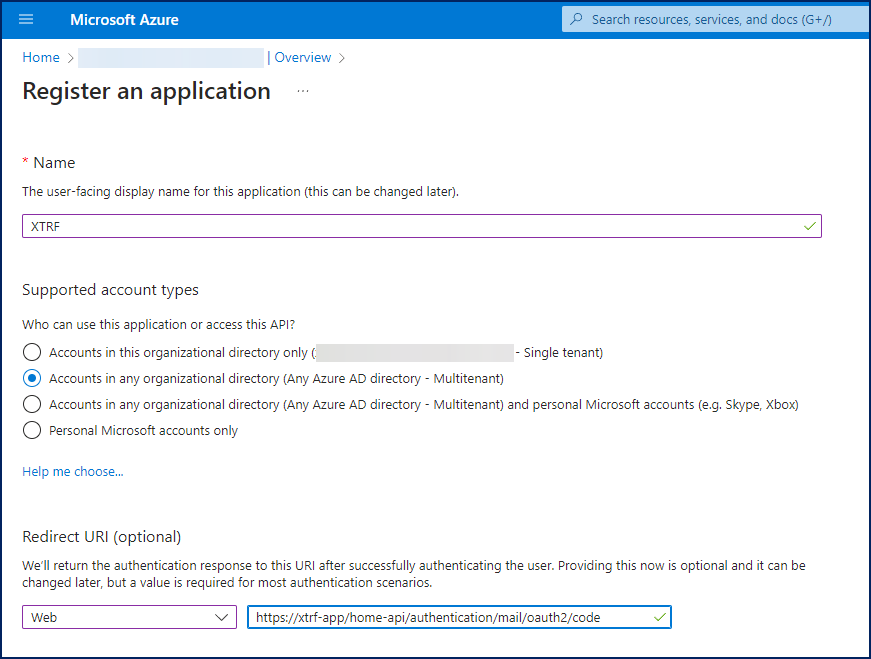
Configure Microsoft Azure account
- Login to your Microsoft Azure account.
- Go to Manage Azure Active Directory > View.
- From the +Add drop-down list at the top of the page, select App registration. You will be directed to the Register an application page.
- Provide a Name for the new app.
- In the Supported account types section, select the Accounts in any organizational directory (Any Azure AD directory - Multitenant) option.
- In the Redirect URI (optional) section:
a. From the Select a platform drop-down list, select Web.
b. Provide a new URI like: {your-host}/home-api/authentication/mail/oauth2/code, where {your-host} is your DNS, e.g., https://xtrf-app/home-api/authentication/mail/oauth2/code - Click the Register button.
- In the left-hand navigation menu, select API permissions.
- Click the + Add a permission button.
- In the Request API permissions right-hand side panel, go to the Microsoft APIs tab and select Microsoft Graph.
- Select the Delegate permission card.
- Locate and select the SMTP and IMAP permissions.
- Click the Add permissions button.
- In the left-hand navigation menu, select Certificates & secrets.
- Click the +New client secret button.
- In the Add a client secret right-hand side panel, provide a description and select the expiry time.
- Click the Add button. The new client secret will appear on the Client secrets list.
- Copy the content of the Value field (this will be the Client Secret in XTRF).
- In the left-hand navigation menu, select Overview.
- In the Essentials section, copy the Application (Client) ID field (this will be the Client Id in XTRF).

Configure XTRF
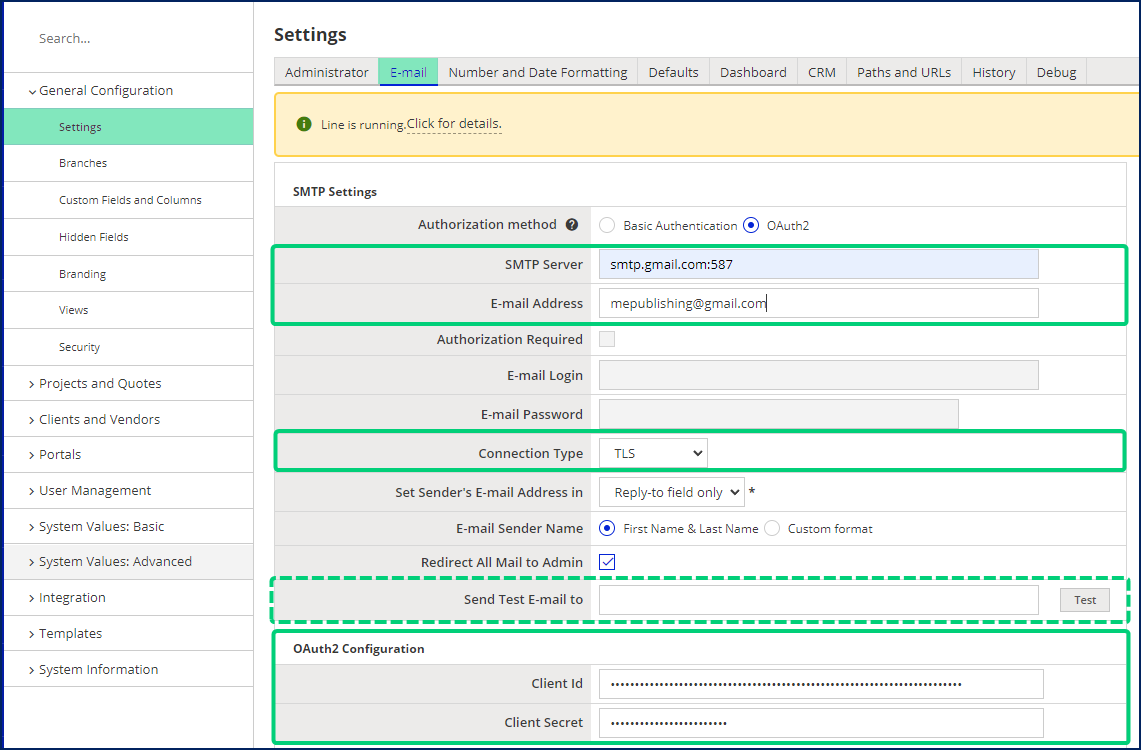
Configure SMTP settings
Once you configure the OAuth 2.0 in one area, the token will be active in other parts of the system as well. After you provide the same SMTP server and e-mail address and click the Save button, a ‘Your access token is active’ message will appear. In that case, there is no need to provide the ClientID and ClientSecret again.
- Go to the
Configuration menu > General Configuration > Settings > E-mail tab.
- In the Authorization method section, select OAuth2.
- In the SMTP Server field, enter:
- smtp.gmail.com:587 for Gmail
- smtp-mail.outlook.com:587 for Outlook.
- In the E-mail Address field, provide your company e-mail address.
- From the Connection Type drop-down list, select TLS.
- Click the Save button.
- In the OAuth2 Configuration section, provide the Client Id and the Client Secret you have copied from Google Cloud or Microsoft Azure accounts (see the instructions above).
- Click the Save button.
- Click the Generate new token button and give the necessary permission to the app. You will receive an ‘OAuth2 Token was generated' message.
- (Optional) Test the connection by entering your company e-mail address in the Send Test E-mail to field and clicking the Test button.
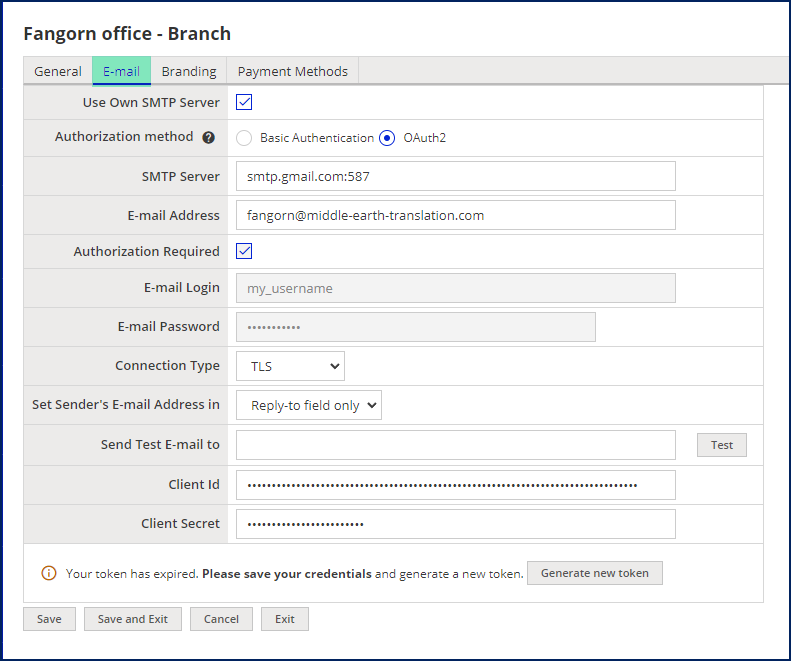
You can also configure the OAuth 2.0 authorization for your company branches:
- Go to the
- Go to the E-mail tab
- Check the Use Own SMTP Server box.
- Select the OAuth2 radio button.
- In the SMTP Server field, enter:
- smtp.gmail.com:587 for Gmail
- smtp-mail.outlook.com:587 for Outlook.
- In the E-mail Address field, provide the branch’s e-mail address.
- From the Connection Type drop-down list, select TLS.
- Provide the Client Id and the Client Secret you have copied from Google Cloud or Microsoft Azure accounts (see the instructions above).
- Click the Save button.
- Click the Generate new token button.
- (Optional) Test the connection by entering your company e-mail address in the Send Test E-mail to field and clicking the Test button.
Configure Smart Connectors
A Smart Connector can be used to automatically create projects and quotes for the selected client based on files from the dedicated e-mail folder. To create a Smart Connector for this purpose, perform the following steps:
- Go to the
- Click the Add Smart Connector button in the top right-hand corner. You will be directed to the Add Smart Connector page.
You can also configure an existing Smart Connector. - Select the Project or Quote radio button according to your needs.
- Provide a Name for the new Smart Connector.
- Select a Client for whom the quotes or projects will be created in the search-as-you-type field.
- (Optional) Select a Budget Code for this client.
- In the Files Aggregation section, select how to process files from the e-mail folder:
a. Process every top level file separately option creates separate projects or quotes for each file from the e-mail folder.
b. Process files in batches option creates one project or quote for all files from the e-mail folder. - In the Scan for Input Files section:
a. In the Files location row, select the E-mail radio button.
b. In the Authorisation method row, select the OAuth2 radio button.
c. Provide the Host Name. Use imap.gmail.com for Gmail or outlook.office365.com for Outlook.
d. Provide the port number 993 in the separate field.
e. Check the Use SSL box.
f. In the Username field, enter your company e-mail address.
g. In the Folder field, provide the e-mail folder name from which the project files are to be uploaded.
h. Provide the Client ID and Client Secret you have copied from Google Cloud or Microsoft Azure accounts (see the instructions above)
If you see the ‘Token is active’ message, you may skip this step. - (Optional) In the After Successfully Processing, Store Files in and In Case of Errors, Store Files in sections, decide whether you want to store the files from an e-mail folder in an XTRF directory or on FTP or SFTP servers. Provide the necessary path or server details according to your selection.
- In the Person Responsible section, select the Home Portal user that will receive notifications about this Smart Connector work (see step 15 below).
- In the Connector Definition section, select the source and target languages, service, and specialization that will be applied to all projects or quotes created by this Smart Connector.
If you are not creating the Smart Connector from scratch but edit an existing one, you can provide the necessary changes in the Robot Code field. - Click the Save button.
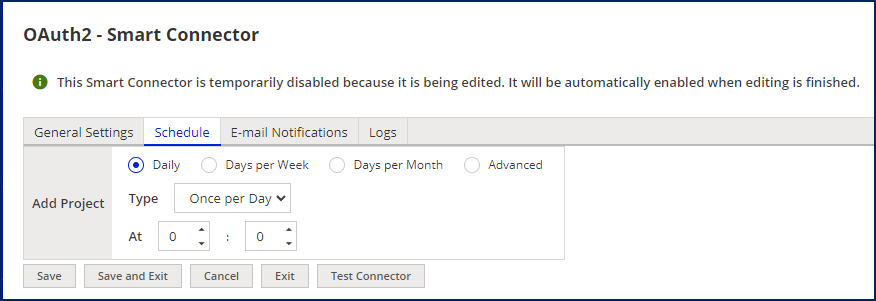
- Go to the Schedule tab. Here you can configure how often the Smart Connector should check for new files in the e-mail folder.
- Click the Save button.
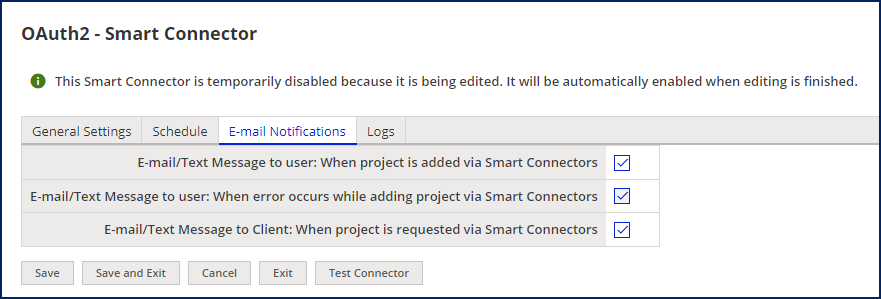
- Go to the E-mail Notifications tab. Here you can select when the responsible person (see step 10 above) and client should receive notifications concerning the projects and quotes created by this Smart Connector.
- Click the Save button.
- (Optional) Check the Smart Connector:
a. Go to your e-mail service and add an e-mail with attachments to the e-mail folder you provided in step 8.
b. On the Smart Connector page, click the Test Connector button. The Smart Connector Test pop-up window will appear.
c. Click the Finish Test button. If all the settings are correct, a new project or quote will appear on your Home Portal.


!After creating a project or quote, the Smart Connector will delete files from your e-mail folder to avoid creating another project or quote with the same files!
Customer support service by UserEcho
