Managing Job Types
This is an old version of the article. Please check the actual version in our new Knowledge Base.
A Job is a part of a project that is related to a specific vendor. It contains a full set of instructions and agreements, including the type of the Job, the assigned vendor, language combination(s), and the time frame.
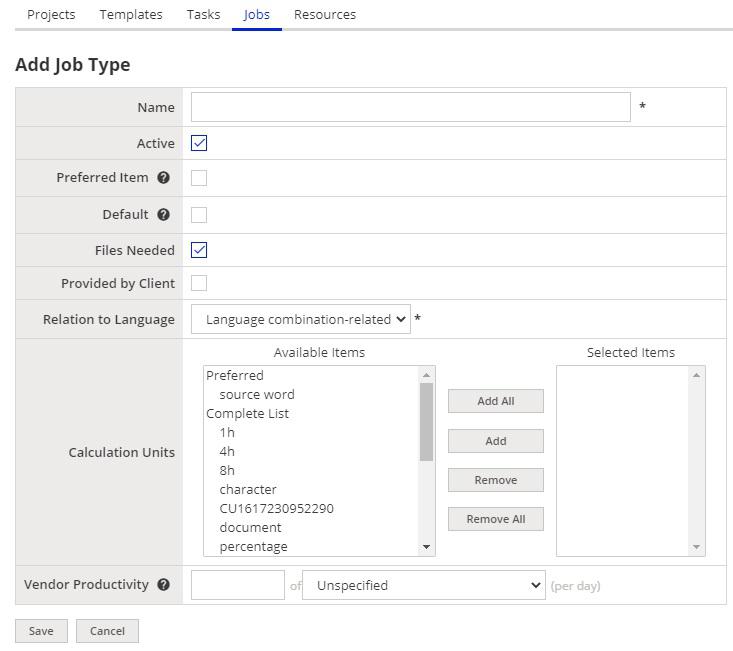
There is a number of default Job Types available in Home Portal. You can customize them or add new ones. To add a new Job Type:
- Go to Configuration menu.
- Go to System Values: Advanced > Job Types. Browse Job Types display appears.
- Click Add to create a new Job Type. Add Job Type display appears.

- In the Name field, enter the name of the Job Type. The name should be unique.
- Check Active option to make the Job Type available for use in Home Portal.
- (Optional) Check Preferred Item option, if you want to display this Job Type at the top of selection lists and drop-down menus.
- (Optional) Check Default option, if this Job Type should be used as a default one in your Home Portal.
- (Optional) Check Files Needed option, if any of the files processed in the project are required to perform this Job Type.
- (Optional) Check Provided by Client option, if this Job Type is to be performed by client in Customer Portal (e.g. Client review).
- From the Relation to Language drop-down menu, select relation type between this Job Type and languages in the language combination:
- (Optional) In the Calculation Units mutli-selection field, add calculation unit(s) for which this Job Type should be available. Use buttons in the center part of the section to move selected calculation units between Available Items and Selected Items columns. Alternatively, you can double-click the item that you want to move from one column to another.
- (Optional) In the Vendor Productivity field, set up Job Type's default daily productivity using selected calculation unit.
- Click Save button at the bottom of the page to confirm your changes.
Customer support service by UserEcho

