Automatic Vendor Assignments
This is an old version of the article. Please check the most up-to-date version in our new Knowledge Base.
Automatic Vendor Assignments is a feature used to design Processes or Process Templates with pre-defined Step assignees. It allows to assign certain people or vendors to particular Jobs in advance.
Automating Vendor Assignments a perfect solution when you have regular resources always handling certain Steps in a Process. Another option of this feature is sending Job Offers for given Steps, instead of assigning specific resources to them.
Global Configuration
Automatic Vendor Assignments is an Automation strictly related to a specific Process, so in order to configure it, you should edit the Process in question. This means in fact that global configuration of this feature requires setting up a specific Process Template appropriately.
To configure Automatic Vendor Assignments in a Process Template:
- Go to the
 Configuration menu.
 - Go to Projects and Quotes > Process Templates (Smart) (alternatively, start typing "Process Templates" in the menu's Search field).
- Click on
 Edit Icon next to the Template you want to configure. (Or click on Add Process Template button to create a new one.)
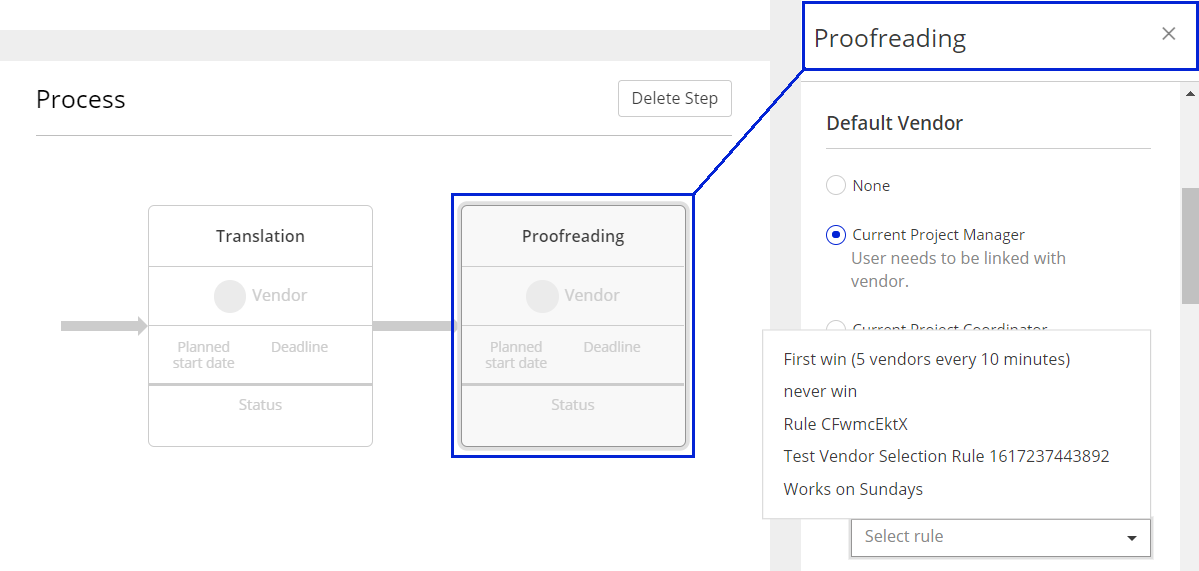
 - In the Process Template Designer select the Step you would like to automate. The Step Sidebar Menu slides in from the right-hand side of the screen.

- In the Step Sidebar Menu, scroll to Default Vendor section.
- In that section, select one of the following configuration options:
- None - with this option selected, no default resource is assigned to the Step (Automation is turned off for that Step);
- Current Project Manager - select this option to make the current Project Manager default assignee to the Step (note: the user needs to be linked with vendor);
- Current Project Coordinator - select this option to make the current Project Coordinator default assignee to the Step (note: the user needs to be linked with vendor);
- Specific Vendor - select this option to assign a specific Vendor to the Step; to choose this option:
- Click Select Vendor button (or, if a Vendor has already been selected, click their name to select a different one). Select Vendor window appears.
- Choose the desired Vendor from the list.
- Click on the Select Vendor button. The Vendor is selected and the window closes.
- Send Job Offers according to rule - select this option if you want to send Job Offers for the Step; to choose this option:
- choose a Vendor Selection Rule from the drop-down list
- Check Start job when Vendor is selected option, if you want the Step to get auto-started after a Vendor wins the Job Offer (otherwise, the Project Manager will have to set the Job to 'Started' manually).
- The settings you choose are saved automatically and will be valid for every new Smart Quote or Smart Project, in which this Process Template is used.
Project-specific Configuration
Automatic Vendor Assignments can also be configured individually per Smart Quote or Smart Project. Such configuration takes precedence over the global settings described above.
To enable Automatic Vendor Assignments in a project or quote:
- Go to the 'Process' card of the Smart Project or Smart Quote in question.
- Click on the Edit Process button.
- Process Designer opens.
- Select the Step you would like to automate. The Step Sidebar Menu slides in from the right-hand side of the screen.
- In the Step Sidebar Menu, scroll to Default Vendor section.
- In that section, select one of the following configuration options:
- None - with this option selected, no default resource is assigned to the Step (Automation is turned off for that Step);
- Current Project Manager - select this option to make the current Project Manager default assignee to the Step (note: the user needs to be linked with the Vendor);
- Current Project Coordinator - select this option to make the current Project Coordinator default assignee to the Step (note: the user needs to be linked with the Vendor);
- Specific Vendor - select this option to assign a specific Vendor to the Step; to choose this option:
- Click on the Select Vendor button (or, if a Vendor has already been selected, click their name to select a different one). 'Select Vendor' window appears.
- Choose the desired Vendor from the list.
- Click on the Select Vendor button. The Vendor is selected and the window closes.
- Send Job Offers according to rule - select this option if you want to send Job Offers for the Step; to choose this option:
- Choose a Vendor Selection Rule from the drop-down list
- Check Start job when Vendor is selected option, if you want the Step to get auto-started after a Vendor wins the Job Offer (otherwise, the Project Manager will have to set the Job to Started manually).
- Click Apply Changes button at the top of the page to save your changes.


Customer support service by UserEcho

