Files card
This is an old version of the article. Please check the actual version in our new Product overview documentation.
The 'Files' card is used for managing project files: manually uploaded documents, as well as links to external resources.
Working with files and in Home Portal
Use the ‘Files’ card for adding work and reference files, sharing files with other Jobs and for delivering translated documents to the Client. The card shows a list of all files exchanged within the Project, uploaded either by the PM/Client or by Vendors through the Vendor Portal.
Regular files uploaded to XTRF are stored on the XTRF server space. To save it, you can use links as an alternative.
Working with links is beneficial to all project participants. First of all, it exponentially increases the range of documents they can conveniently share and work on, since links can lead to websites, online files, cloud disks, SFTP servers, videos, external apps, and others. Secondly, users don’t need to bother with running multiple instances of heavy files through XTRF, which is a huge relief to server space. Also having one directory where all parties store multiple instances of documents is much easier to follow.
Adding files
In order to add a new file to a Project, drag it to the 'Files' card or click on the Add Files button.

A pop-up will be displayed where you can specify the Category of the file being uploaded as well as the Language it refers to.
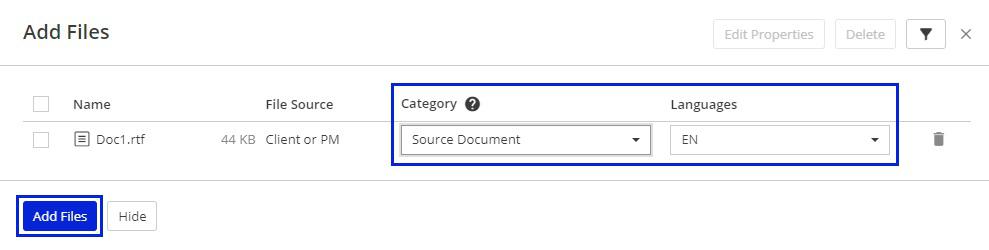
Click on the Add Files button. The file added will be displayed on the list.
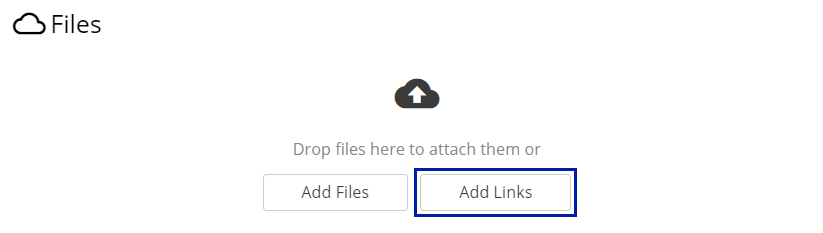
Adding links
To add links to online resources, click on the Add Links button.
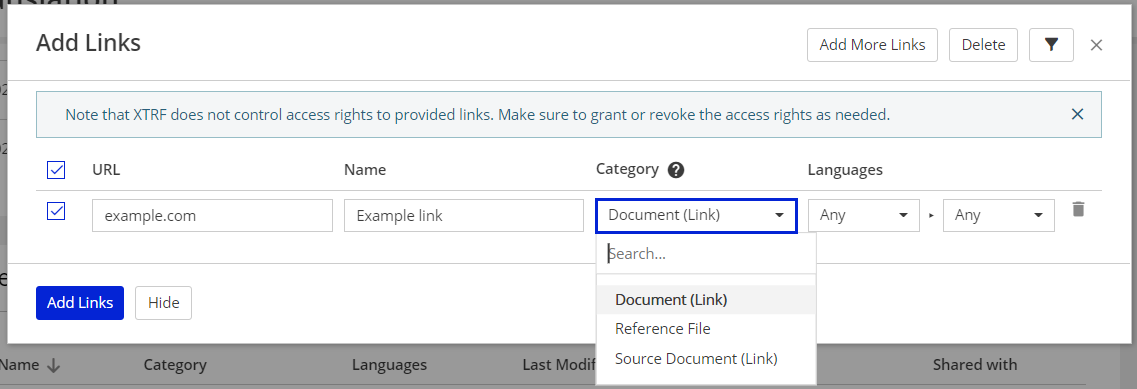
A pop-up will be displayed where you can paste the URL into the online document, give it a name, and choose the language it refers to, and the category:
- Document (Link) - a default category for link deliverables
- Reference File
- Source Document (Link)
Note
The system will enforce inserting a valid URL. The URL address should start with http://, https://, sftp:// or ftp://.
Adding more files and links
Click on Add Files. To add more links, click on the
Drop-Down Icon, and Click on Add Links.

Managing files and links
There are a number of operations that can be performed on files and links. Select one or several in the ‘Files’ card by ticking the checkboxes next to their names, and click on the File Actions button:
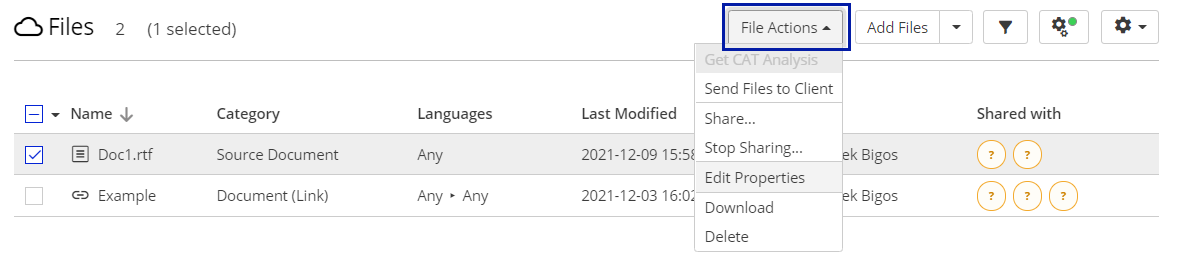
Send Files to Client — The selected files will be sent as deliverables to the Client. This does not apply to links.
Share… — the selected files / links will be shared with a specified Job in the process. You can also decide whether the files / links should be treated as work or reference files:

Stop Sharing… — the option allows you to unshare one or several files / links with specific Jobs.
Edit Properties — use the option to change the file / link category and languages.
Download — allows you to download selected files (does not apply to links).
Delete — deletes selected files / links from the project.
Applying filters
Click on the ![]() Filter Files icon. The following filters will be displayed:
Filter Files icon. The following filters will be displayed:
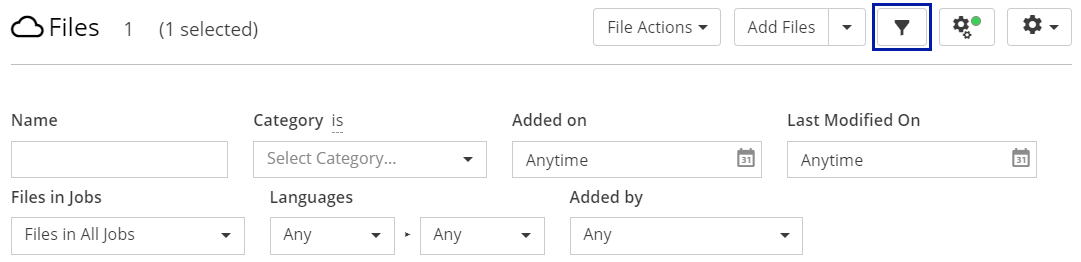
Name — filters by file and link name.
Category — filters files and links by category.
Added On — filters files and links by the upload date of uploading.
Last Modified On — filters by specific dates of modification.
Files in Jobs — there are two options available in the filter: Files in All Jobs and Files in Final Jobs. Files in All Jobs will display all the files and links available in the project, while Files in Final Jobs will show only the files and links delivered by the final Job in the project.
Languages — filters files and links by source and target languages.
Added by — filters files and links by the person who uploaded them.
File and link displaying
Click on the Settings Icon to define the number of items that will be displayed in the files list:
Automatic Configuration
Click on the ![]() Automatic Configuration icon to specify the automatic delivery options in the project:
Automatic Configuration icon to specify the automatic delivery options in the project:
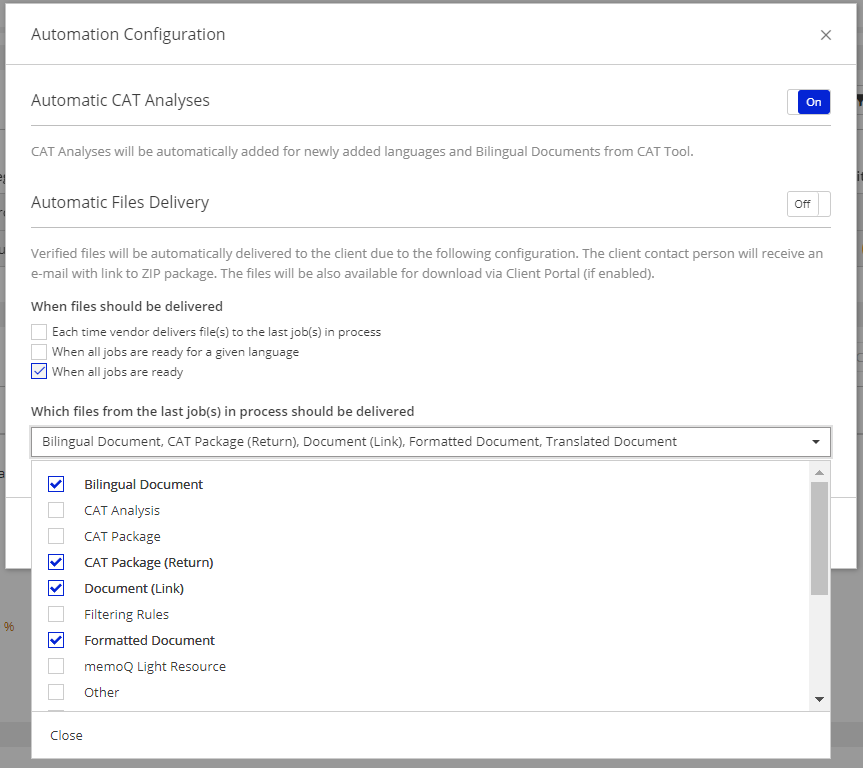
Automatic CAT Analyses: switch the toggle On to include new languages and bilingual documents to be automatically included in the CAT analyses from CAT tools.
See more info in THIS ARTICLE.
Automatic Files Delivery: switch the toggle On to enable the option.
Go to ‘When files should be delivered’ section and tick the preferred checkboxes to define when the deliverables should be sent to the Client.
Go to ‘Which files from the last job(s) in process should be delivered’ section. Click on the drop-down list and tick the preferred checkboxes to specify which file categories will be eligible for delivery.
Lastly, click on Apply changes to modify the file delivery settings.
This automation does not apply to links.
See more info in THIS ARTICLE.
Customer support service by UserEcho

